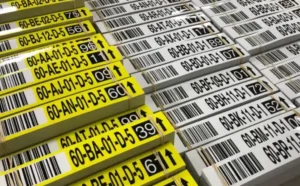
Without clear, visible, and durable labelling, it’s easy for warehouse operations to descend into chaos, with delays, errors, and safety risks. Racking labels play a vital role in keeping your warehouse running efficiently, by clearly identifying storage locations, levels, and item information.
This blog will guide you through the different types of racking labels: what they are, how they’re used, how they work together, and why they’re essential.
Aisle Markers
Although they’re technically a type of warehouse signage as opposed to a type of labels, aisle markers are part of the identification system used to accurately store and locate items in a warehouse. They are typically positioned at the entrance or at intervals along each aisle, allowing staff to easily navigate and locate specific areas.
Aisle markers often include a combination of numbers or letters. For example, the first aisle in your warehouse may be labelled “AA”. This makes it simple to match the correct aisle with the corresponding bay or location.
Well-positioned aisle markers help to prevent errors and reduce the time it takes to locate stock, which significantly improves warehouse efficiency.

Split Beam Labels
Beam labels are identification tags attached to the horizontal beams of a racking system in a warehouse. They include data such as aisle reference, section identifiers, level designations, or even barcodes for scanning.
So how are split beam labels different? Split beam labels are placed on the first beam level from the ground, and are split horizontally to identify two locations: a location on the ground and a location on the first beam level. They’re designed this way to avoid having to place location labels on the floor, which are prone to damage.
Without split beam labels, workers may struggle to find the exact spot for a pallet, causing confusion and delays. Poorly positioned or missing labels can lead to misplaced inventory, so be sure to read our guide on how to efficiently label a warehouse.
Upper Beam Labels
Upper beam labels are located on the higher levels of the racking system, often above head height. The type of beam labels used will depend on whether you run “man up” and “man down” operations. In a warehouse, “man-up” operations involve operators using elevated work platforms to reach high-level shelves and manually retrieve items from elevated racks. In this scenario, beam labels tend to be smaller as the operator will be close enough to the label to read it and scan it.
On the other hand, man-down operations keep the operator on the ground while only the forks or lifting mechanism of the equipment are raised. The operator remains at ground level, and the equipment is used to reach items stored at various heights. In this situation, upper beam labels will be designed to be clearly visible from below, often using bright colours and reflective materials for good visibility. Split labels will usually be used on the first beam level, with barcodes and colours corresponding to the higher levels of the racking system, in order for the operator to be able to scan all levels from the ground.

Upright Beam Labels
Upright beam labels are positioned on the vertical supports or beams of a racking system, referred to as “uprights”. They typically provide a reference for the entire rack or row, indicating the section or location number. These labels are particularly useful for orienting staff when navigating the warehouse, as they help workers quickly identify which row or section they are in.
Level Indicators
Level indicators are labels that denote the vertical position of each rack level. These labels are typically colour-coded and placed on the uprights or beams to help workers easily identify where a particular item is located. The colour coding corresponds to a label at ground level, which directs employees to the correct height for picking or storing items. This system is especially useful in large, multi-level warehouses, where clear visual cues help staff quickly locate the right rack level.
The use of colour-coded level indicators ensures that warehouse staff can accurately identify which level to access, reducing the risk of miscounting levels or incorrectly placing items. Without these indicators, employees may face confusion and inefficiencies, leading to errors in stock placement or retrieval.
Why Quality Racking Labels Matter
Investing in high-quality racking labels can make a big difference to how your warehouse operates. Labels like those that we supply are designed to handle the challenges of busy warehouse environments, from fluctuating temperatures to heavy use. Their durability ensures they won’t peel or fade, even in demanding conditions, while their clear print makes scanning and identifying stock much easier.

Racking labels might seem like a minor detail, but they’re essential for maintaining an organised, efficient, and safe warehouse. Whether it’s beam labels for specific storage spots, upright beam labels for easy navigation, or aisle markers for quick orientation, each type serves a unique purpose. Without them, your warehouse could face delays, misplaced inventory, and safety risks.
Looking for racking labels that stand up to the challenges of modern warehousing? Our durable and customisable labelling solutions help you stay organised, minimise errors, and maximise efficiency. Contact us today to explore the right options for your warehouse needs.