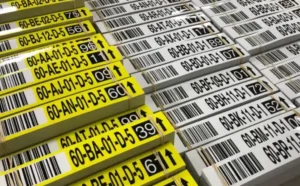
When you place a label order with us, or any printing order for that fact, we will ask you to approve a ‘proof’.
What is a location labelling proof?
A location labelling proof is an important document as it’s your opportunity to tell us that things aren’t right. A proof is a preliminary version of a printed document, created so that you can review and approve the content, layout, and colours before the final print run. It’s essentially a prototype of your final product that we send you to approve before we continue with the labelling job.
Why do you need to check and approve your location labelling proof?
We’ve been printing location labels and asking for proof approvals for a long time now and we know that if this was checked properly and we work together on getting it right, errors may be picked up that didn’t get noticed when going through the artwork creation process.
So, please pay attention to the document, as well as this blog post because checking if your location labelling proof is correct is really important.
1. Order Details & Address
Check your purchase order number is correct, and the addresses we have are correct. If they’re not correct, let us know and we can amend them.It has been known, only once or twice fortunately, that we’ve turned up at the wrong site, so please make sure to get the addresses correct.
2. Print the Location Labelling Proof
Then we can move on to the label itself. Now, we will have sent you a PDF file via email. The best way to check that the label is correct, is to print that off onto A4 paper; normally that’s the adequate label size.
Note: It might shrink it down a little bit, but as the location labelling proof approval process is mostly to check the details of the labels, it’s not going to make too much of difference if it doesn’t print on your printer exactly the same size as the final product.
Check the details
Once you’ve printed off the proof, take a hard look at the details such as:
- Are the colours correct?
- Are the arrows facing the right direction for that particular sign?
- Does it have the right number of characters in the eye-readable?
We’ll come on to barcoding later, but start with a good visual check: is there anything there that you’re concerned about? A phrase I’ve had a lot in my life is “if it doesn’t feel quite right please say so”. The chances are you’re on to something.
3. Check the barcode
Once you’ve completed a visual check, move on to the barcode.
Note that oftentimes, the barcode content doesn’t match the eye-readable.
If this is the case, it’s because something may not have been scanned at your end, resulting in a different barcode to be printed on the label.
On the final page of the proof document, there will be a spreadsheet showing what the barcode reads. Please pay attention to that when checking your location labelling proof. It needs to be 100% correct. Even the smallest dash in the wrong place can cause a problem and impact the efficiency of your operations.

4. Assess the Location of the Labels
The Racking/Shelving Surface
Now that the label is checked off, we need to make sure the label is compatible with your racking or shelving system.
The label needs to sit on the flat face of the Shelf Edge or the beam, ignoring the roll at the top and the bottom.
Some racking manufacturers such as Whittan have a very slight crease that runs through the middle of the beam, which isn’t a problem. You can install the label either in that area or across the area to resolve the issue.
Also make sure to pay attention to the top and bottom of the label and if the surface of the racking or shelving system will cause any rolls. The vast majority of the time the surface will be flat, but if you’ve got any protruding elements or an unusual profile, it’s best to get in touch with us and we’d be happy to advise.
From an upright point of view, if you’re putting labels onto Apex and you haven’t already mentioned this to us when placing your order, now is the time to flag that up. The upright label we use tends to stick to the slightly indented surface that comes from punching coffin slots in steel. We’d need to make sure the shelf label isn’t too big to fit across the width of the upright.
Surface Cleanliness
The next thing to look at is the beam itself. Two things here:
Is it dirty?
Has it got any surface dust on it that needs to be removed?
Adhesives don’t stick very well to dirt: they just stick to the dirt and then the adhesive can’t stick to the steel behind it.
Don’t be deceived if you don’t immediately see any obvious signs of dirt. If your racking isn’t particularly smooth, please flag that up because there’s a good chance we won’t get a good enough surface contact from the adhesive to the steel. It may be that the steel surface has a matte or mottled finish or it may look like a golf ball if it’s structural steel.
However, if the steel is powder coated or galvanised and it’s smooth, the adhesive of the warehouse location labels will stick just fine to the surface. You still need to ensure that you remove dirt.
The Warehouse Environment
One point that many don’t always consider when choosing the right location label is the environment in which the label will live, specifically the temperature of the warehouse.
If it’s ambient, above 2 degrees celsius, a standard adhesive is fine.
However, if the location label will be placed within a freezer, or a Temperature Control building and it’s below zero before we adhere the labels, you must let us know. This is because, to ensure maximum quality, we may need to print onto a different material with a different adhesive.
The temperature of the beam, also known as the application temperature, at point of application, is important for ensuring a strong hold.
Note that our data sheets refer to the service temperature being acceptable down to minus 30, but it’s the application temperature that’s important. What temperature will the surface be at when we’re adhering the label?
5. The Location File
Last but not least, there is just one more thing to check.
It’s highly likely that we’ll have sent you the actual print file. This will be a location file that we’ll feed through the computer to create the variable data.
This will be one line per label so make sure that you’re comfortable with it and check that off on the document. We’ll have volumes on it.
On the back page containing the spreadsheet we mentioned earlier, there will be information about the number of labels, the size and more. Again, have a very good read of that. This is your last opportunity to tell us that something isn’t quite right.
6. Press send!
So once you’ve done all of the above and made your way through our checklist for approving your location labelling proof and you’re comfortable that everything is correct, simply sign the document and send it back to us.
Remember! If you have any questions at all, please flag them up. We take great pride in offering an excellent service and want to ensure that you’re completely satisfied with the end product.
Happy labelling!